For Halloween at work our team decided on the theme of Toy Story. We would decorate our area on the floor to be Pizza Planet and everyone would dress up as a Toy Story character or a Pizza Planet employee. Being the Star Wars fan that I am, and with my coworkers knowing it too, I went for the Darth Vader likeness Emperor Zurg. My plan was to 3d print a mask I could wear and to pair that with a top that matches the characters. After some quick googles to confirm my plan was possible I found a running shirt on Etsy that was Zurg themed and a model on thingiverse that appeared to be a video game render of Zurg.
I downloaded the model into a 3d modeling program, blender, and began my work. First to size it up to something reasonable for the top of my head. After importing a few other helmet models for scale I got the head to around a size that seemed reasonable. The bigger issue was making the model ready to print. The head had 3 main issues.
It was a full head and needed to be hollow inside to sit on my head.
It was a video game render and not a solid object to be printed.
It was too big to make in one print on my 3d printer, it needed to be split up.
I started with making it a solid object. Painstakingly moving vertex by vertex through some parts of it I began combining and cleaning up parts of the model so they formed complete 3d geometric shapes vs the current 2d planes. Zurg's mouth was the biggest culprit of this issue as a lot of the edges would just end halfway inside his head at a single point instead of closing up on themselves. This took a few months of just spending a bit of time each day cleaning up what I can then taking a breather to return back to later. I could check my results by Exporting the model to a slicer problem which prepares the model for print. In there I could view what the final print steps are and (when I wasn’t fully complete) half the helmet just disappeared in the steps showing that it was not a full geometric shape.
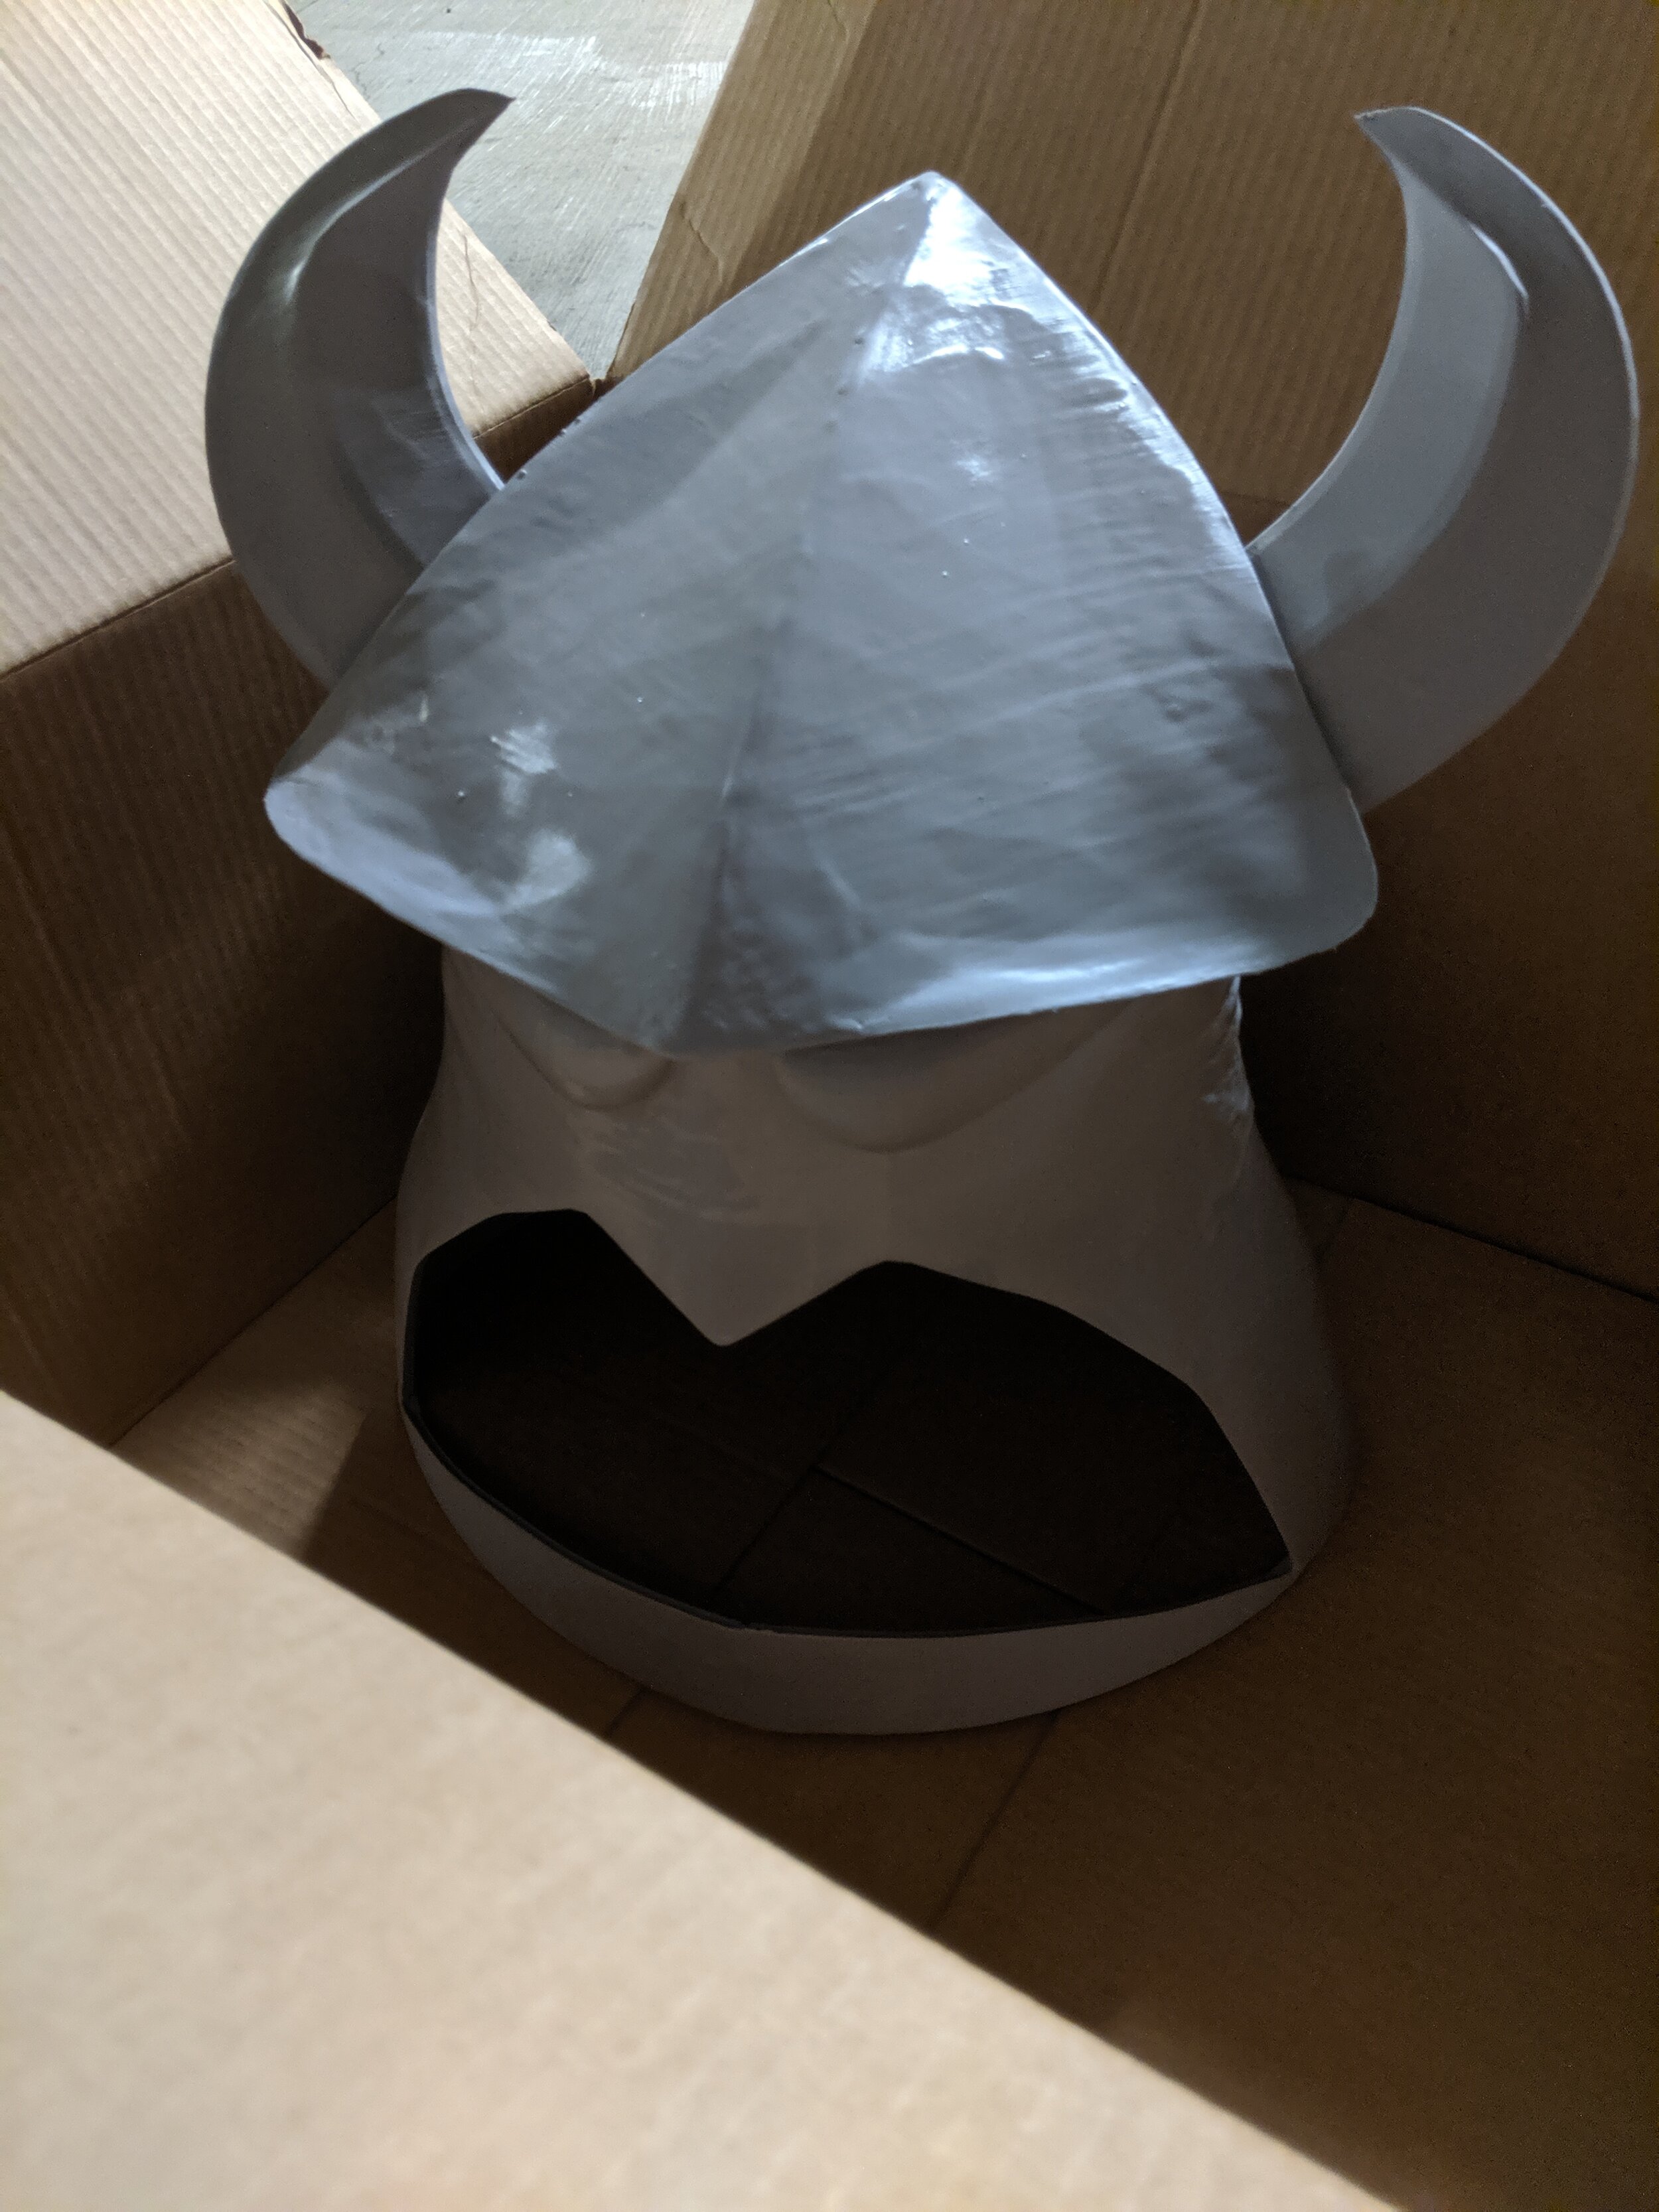
After getting most of the helmet solid I worked on the next issue, making it a helmet. This step was halfway done in the print but I finished the process on the printed model. In the software I inserted a handful of sphered and cylinders up from the bottom of the helmet using subtractive functions to remove sections of the inside. Again using the other downloaded helmets I could compare both the total size of the model and to make sure I was clearing out enough space inside.
Finally once I determined the helmet was good to print it was time to break it up. Just as my 3d printed Boo taught me steams are a lot of work to cover up. So I wanted to make it as few pieces as possible. But this was also the biggest print by far I ever did and also with it sitting on my head I didn't want to trust the usual flat joints against each other. I first picked where the seams would go on the helmet to split it all up and created those. But following up I modeled in butterfly joints. Also called dovetail keys they are basically little bowtie shapes that helmet bind seams together creating much tighter bonds that are not easily separated. The material would need to fail, and fall apart, instead of just the glue.


With everything split it was time to print. Which was a relatively easy, but long process, total the helmet took 144 hours and 48 minutes which was on pretty fast settings. Not that I was rushing too much but I also didn't plan to finish Zurg to as fine detail as I did Boo. After fully printed I moved to assembling all the parts. I put together everything except for his mouth as that could be easily included later glued from the inside so I could paint it separately. After it was all assembled I started verifying that it could actually fit on my head. While not molded perfectly the helmet was a little tight and sat high on the head but it was there. Not willing to work on enlarging it more I continued with finishing the head and would later worry about making sure it stayed on. I began fast and heavy on Zurg filling in the seams with some heavy coats of Bondo. Then after some light sanding I brought it outside to empty an entire spray can of primer filler on the helmet. Making sure to really lay it on thick near the steams. It began to pool and drip in a few areas as I was laying it on I feel like I could have still used the can but over more time letting some lighter coats dry between instead of cracking. Sanding that down to a decent smooth feel I moved onto final colors. A spray can for the purple main coat and airbrushing for the finer detailed red eyes and silver horns. For the mouth I started with a yellow spray can and finished up with black airbrushing for the "teeth". After that all dried a dusting of clear coat to keep it all together and Zurg was complete! From the modeling inside I was able to balance the helmet on my head with minimal issue and it stayed well enough for pictures.


As well as the costume I wanted to add some more decoration to my desk so I looked around thingiverse some more and found this pizza planet roof ornament that tops the delivery vehicle in the movie. This model was a quick 3d print with 2 main pieces. Wanting to put a bit more care into this than Zurg, and since it had only a single seam, I used a slower fine detailed print speed and after it was all complete spent some time making sure the seam was a invisible as I could get it. After the typical sanding/primer coat I finished it up with a white base coat for the rocket and red coat for the fins.
My initial plan for the lettering was to mask off and spray can paint those too but after just doing a fraction of the masking found it too complicated with the tape I had and instead decided on a small hand brush with some acrylic paint. Blick Art Materials is just a short train ride away from me and has been a huge source of art materials that I've used for the last year of projects. They had acrylic paints which perfectly matched the spray can and with a fine edged brush the lettering turned out perfect.


