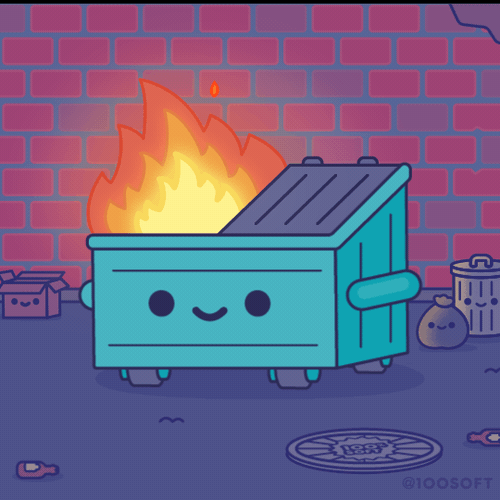
What do you get people for the year that gave so much. Anyone reading this should know all the wonders and fears 2020 gave us and about halfway through the year this certain cheery as fuck Dumpster Fire kept making rounds on my social media feeds and I knew what project I was going to do. Pivoting away from my original design but with the same presentation I had the idea of a dumpster fire fridge magnet for 2020, built using a home laser cutter that I’ve been wanting to get for a few years.
Before making the plunge on a very expensive machine that could easily kill me if used improperly I decided to see if this type of making was a skill I could figure out how to do. While 3D printing is an additive process (combining multiple layers of melted plastic together) laser cutting is a removal process (2 dimensional cutting out or scoring and engraving from a solid piece of material (acrylic, wood, etc)). I booted up Adobe Illustrator and started taking some time trying to learn the software, see what I can pickup and what needed to be googled. After a few hours I was able to get a good copy from the dumpster fire source but the perspective didn’t seem like it was correct, something just seemed off. Finding the correct prospective tool in Illustrator I started going off script making a more loose copy of the original dumpster fire but keeping it at the right angles, this proved to be crucial later on when I added text into the whole pattern. While designing the dumpster I would group the different parts on different layers in the file, this greatly helped the laser cutter in its processing of figuring out which actions to take on which lines.
The initial design was made around Aug/Sept while I sat on it for a bit seeing if I would still like it as we approached the holiday season. With everything set as we rolled into November I pulled the trigger and ordered a Glowforge Plus!


The idea of using a laser cutter was to make something as professional looking as I could for this magnet. The acrylic material that can be laser cut usually comes with a protective paper backing which acts as masking to make sure no burn marks get onto the acrylic. If I used clear acrylic and cut score lines around each of the areas that were to be colored I could remove the masking one color at a time and paint the exposed area of the acrylic. Layering up each color as I pulled off more masking until I had the entire acrylic shape colored. While it would look like a solid color on the side being painted when you remove the masking on the other side of the clear acrylic each color should shine through, or at least was my plan which I wouldn’t know until I tried it out.
Coming up with an initial production count of about 30 magnets I was trying to see what ways I could save some time while making them. I split production into two different types of magnets, 10 high quality ones and 20 lesser quality. The black portions of the magnet could be done as the rest with scoring the lines but removing the masking for each letter turns tedious fast so I tried engraving the black areas instead. The engrave would burn down into the acrylic while also removing the mask at the same time. Since these parts were to be painted black any burning residue from the acrylic should only aid in the black filling. All the magnets would have a wooden border and wooden backing to them from which a magnet would be attached to and all painted black.


Once the laser cutter arrived I eagerly got everything setup and did some test cuts recommended by the manufacturer. They helped make sure the calibration was still correct and gave me a loose understanding of the simple UI supplied. While talking to other makers I associate the Glowforge as being the Apple of the industry. While the product does come at a pretty high surcharge it worked right out the box and with a simple UI that runs in a web browser and doesn’t require and new software installed, not even a direct USB connection. This definitely made the decision a bit challenging for me as if the company goes under or even if my Internet is out I cannot use the laser cutter at all. At the same time it’s a fraction of the size compared to other units and can reasonably be considered something usable in a 600 sqft apartment. After the test cuts I threw in my original dumpster fire file just to see what it could look like on a draftboard material.


Knowing I had the laser cutting file working at least well enough for a wooden pattern I moved onto the acrylic. First testing with a single cut & paint to see what the production pipeline would look like. I had no idea how the engraved text would look so I decided to try that one first. Since my idea was to have the paint technically be on the back of the acrylic portion of the magnet I had to flip the entire object to be cut, which will make more sense when you see how the magnet is flipped. Not wanting to have to make multiple trips outside I decided to airbrush the acrylic instead of aerosols. Which was a great time to upgrade my year and a half old Harbor Freight off brand brush with a super high quality Iwata brand. For the acrylic paint test I used what close enough colors I had on hand and saved a few steps by painting one color for all the flame layers. The results blew me away and I quickly tried the other (non etched, higher quality) dumpster fire to compare the results.


With the design and colors decided on it was a nice weekend project of cutting, painting, and assembling 30 dumpsters. Laying out all the acrylic dumpsters out on scrap cardboard it was a pretty streamline process of painting each color across all of them, and by the time I had cleaned the airbrush and peeled off the next layer the paint was dry again and ready for the next coat. With all the acrylic and border/back wood painted it was time to glue everything together. I used super glue to secure the wood and acrylic together and 2 part epoxy holding the magnet on the back. I had some issue at first with superglue seeping through the edges and messing up the acrylic so after a few mistakes (and not many spare dumpster fires) I laser cut a mold that allows me to attach everything together mostly hands free keeping the super glue away from anything dangerous until it fully cured. After hours of work and a big sigh of relief I somehow managed to pull off what I think is the most professional, and bad ass, Christmas magnet to date. Fuck 2020


